
A crown can look correct on the model and still fail to fully seat during try-in. It may stop short of the margin, bind at a proximal contact, feel high, or appear to have an internal interference.
When this happens, repeatedly adjusting the crown is not always the best first step. The cause may have started with the preparation, tissue management, scan or impression, case information, laboratory design, or the restoration itself.
A crown that does not seat is often a workflow problem rather than a single-point failure. The key is to identify where the problem may have entered the process before making unnecessary adjustments
Why a Crown May Not Seat Properly
Complete seating depends on several stages working together:
Preparation → Scan or impression → Case prescription → Laboratory design → Fabrication → Try-in → Final delivery
A problem at any stage can affect the final fit. Digital workflows can make information transfer more efficient, but they do not eliminate the need for an accurately prepared tooth, clear margins, complete scan data, and reliable clinical records. Research supports digital impressions as a viable approach for crown fabrication, while also showing that scanning conditions and data quality can influence the resulting fit.
1. Preparation-Related Problems
The preparation establishes the geometry the laboratory has to reproduce.
Potential issues include:
- Undercuts that interfere with the intended path of insertion
- Irregular internal features
- An unclear path of insertion
- Inadequate reduction for the selected material
- Limited restorative space
- An unclear or inconsistent finish line
These problems can affect seating in different ways. An undercut may interfere with the path of insertion, while inadequate reduction can limit the laboratory’s ability to create the intended restoration within the available space.
The important question is not simply whether the preparation looks acceptable. It is whether the preparation provides a clear, reproducible geometry that can be accurately captured and restored.
2. Margin and Tissue Management
A well-prepared tooth can still become a difficult crown case when the finish line cannot be clearly captured.
Subgingival margins, bleeding, moisture, inadequate retraction, or tissue covering the preparation can make the margin difficult to record accurately.
This matters in both conventional and digital workflows. A scanner cannot reproduce a margin it cannot clearly see, and a conventional impression cannot accurately transfer information that was never properly exposed.
Before submitting a case, make sure the finish line is clearly visible around the preparation and that moisture or tissue is not obscuring important areas.
3. Impression or Digital Scan Problems
Digital scanning has improved the way many practices submit restorative cases, but the quality of the final restoration still depends on the quality of the captured information.
Look for:
- Incomplete margin capture
- Missing scan data
- Scan artifacts
- Moisture or blood affecting the scan
- Incomplete adjacent-tooth information
- Inaccurate bite registration
- Missing opposing-arch information
- Distortion in conventional impressions
A digital scan should be reviewed before submission rather than assuming the software has captured everything correctly.
Rotate the preparation and inspect the finish line, adjacent teeth, occlusal surfaces, and bite relationship. If important information is missing, correcting the record before fabrication is usually preferable to discovering the problem at try-in.
4. Tight Proximal Contacts
A tight proximal contact can prevent a crown from reaching its intended position.
This is an important distinction because a crown that stops short of the margin may not necessarily have an internal-fit problem. If the restoration is binding against an adjacent tooth, the proximal contact should be evaluated as part of the diagnosis.
Clinical research has specifically examined the relationship between proximal contacts and complete crown seating.
The goal is to identify the source of the interference rather than simply removing restorative material until the crown seats. Excessive adjustment can affect contact form, anatomy, or other aspects of the restoration.
5. Internal Fit and Laboratory Design
Not every crown seating problem originates clinically.
The laboratory works from the preparation and records provided. During CAD design and fabrication, factors such as internal geometry, marginal design, digital model quality, material processing, and manufacturing can influence the final restoration.
A crown may have an acceptable external appearance while still encountering an internal interference that prevents complete seating.
This is also why communication between the dentist and laboratory matters. If the laboratory knows exactly what happened during try-in—where the crown stops, what was checked, and what was already adjusted—it has better information for evaluating the case.
6. Occlusion: Check Seating First
A crown that feels high does not automatically have an occlusal problem.
First determine whether the restoration is fully seated.
If the crown is stopped short by a proximal contact, internal interference, preparation issue, or another obstruction, the occlusal relationship may not represent the restoration’s final position.
Adjusting the occlusion before confirming complete seating can therefore address the wrong problem.
Once complete seating is established, occlusion can be evaluated as part of the normal try-in and delivery process.
7. Final Delivery Considerations
Before final cementation, confirm that obvious factors are not preventing complete seating.
Check for:
- Residual temporary cement
- Debris on the preparation
- Tissue interfering with the seating path
- Complete seating of the restoration
- Marginal adaptation
- Proximal contacts
- Occlusion after seating
The important distinction is between a crown that is fully seated but needs a minor adjustment and a crown that has not reached its intended seating position.
Those situations should not be treated as the same problem.
A Simple Chairside Approach When a Crown Won’t Seat
When a crown does not fully seat, use a structured evaluation rather than immediately making significant adjustments.
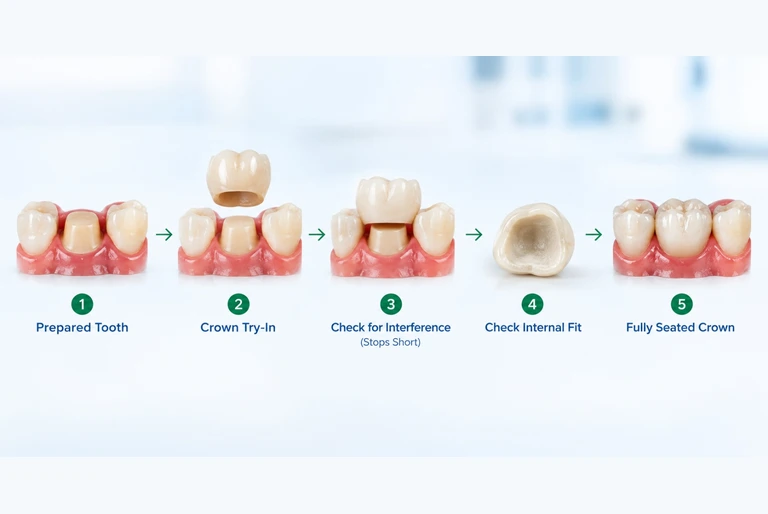
Check the preparation
Make sure the preparation is clean and free of temporary cement or debris.
Confirm the seating path
Consider whether the preparation and restoration appear compatible with a clear path of insertion.
Check proximal contacts
Determine whether contact with an adjacent tooth could be preventing complete seating.
Consider internal fit
If proximal contacts do not explain the problem, evaluate whether an internal interference may be involved.
Check the margins
Determine whether the restoration is reaching the finish line circumferentially.
Evaluate occlusion after seating
Do not assume a high spot is the cause until complete seating has been confirmed.
Communicate with the laboratory when necessary
If the cause remains unclear or significant adjustment could compromise the restoration, pause and contact the laboratory.
Providing the laboratory with specific observations from the try-in can help determine whether the preparation, clinical records, restoration, or laboratory design needs further evaluation.
How Dentists Can Prevent Crown Seating Problems
A predictable crown begins before the restoration reaches the chair.
Crown Seating Prevention Checklist
Preparation
- Establish a clear path of insertion.
- Provide appropriate reduction for the selected material.
- Avoid unnecessary undercuts or irregularities.
- Make the finish line clear and continuous.
Tissue management
- Control bleeding and moisture.
- Retract tissue sufficiently.
- Make the finish line visible for capture.
Scan or impression
- Inspect the complete preparation before submission.
- Confirm margin visibility.
- Capture adjacent teeth completely.
- Verify the opposing arch and bite.
- Look for holes, artifacts, or missing data.
Case prescription
- Clearly identify the tooth and restoration.
- Specify the material and shade.
- Include useful clinical photographs when appropriate.
- Communicate unusual preparation or occlusal considerations.
Laboratory communication
- Provide complete case information.
- Communicate relevant clinical limitations.
- Tell the laboratory about concerns identified during try-in.
- A few minutes reviewing the case before submission can prevent an information gap from becoming a chairside problem.
When Should You Stop Adjusting and Contact the Dental Lab?
Not every crown that needs adjustment needs to be returned to the laboratory. However, repeated adjustment should prompt reassessment when the cause is uncertain.
Consider contacting the laboratory when:
- The crown repeatedly stops short of the margin.
- Proximal adjustment does not resolve the seating problem.
- The seating path remains unclear.
- There appears to be an internal interference.
- Marginal adaptation is questionable.
- Significant material removal would be required.
- The preparation or scan may not accurately represent the clinical situation.
The purpose of contacting the laboratory is not to assign blame. It is to identify where the workflow needs to be reviewed.
Useful communication should include what was observed, where the crown stops, what has already been checked, and whether anything about the preparation or clinical records has changed.
That gives the laboratory a much better starting point for evaluating the case.
For dentists who want to review their case submission process, Palm Beach Dental Lab provides resources for digital case submission and restorative laboratory workflows.
Have a crown case that needs a second look? Send the case details to Palm Beach Dental Lab and discuss the restoration with our team.
Final Takeaway
When a crown won’t seat, the first question should not simply be:
“Where should I adjust it?”
Instead, ask:
“Where could the seating problem have entered the workflow?”
Preparation geometry, tissue management, scan or impression quality, bite records, proximal contacts, internal fit, laboratory design, and delivery conditions can all contribute.
Frequently Asked Questions
A crown may fail to seat because of tight proximal contacts, internal interference, preparation geometry, inadequate margin capture, scan or impression errors, tissue interference, or debris on the preparation. The cause should be identified before making significant adjustments.
Yes. An overly tight proximal contact can stop a crown before it reaches the intended position. The contact should be evaluated as part of the overall seating diagnosis rather than assuming the problem is internal fit.
Yes. Missing margin data, scan artifacts, moisture, incomplete preparation capture, or an inaccurate bite record can affect the information used to design and fabricate the crown. Reviewing the scan before submission can help prevent these problems.
Not immediately. First confirm that the crown is completely seated. If the crown is being held away from its final position by a proximal contact or internal interference, adjusting the occlusion may address the wrong problem.
Start with the preparation. Make sure it is clean and free of temporary cement or debris, then evaluate the seating path, proximal contacts, internal fit, and margins. Occlusion should be assessed after complete seating is confirmed.